Showing posts with label Classroom. Show all posts

Wednesday, October 11, 2017

New Google Classroom Features

In case you missed them - here are five recent updates to Google Classroom you may find useful.


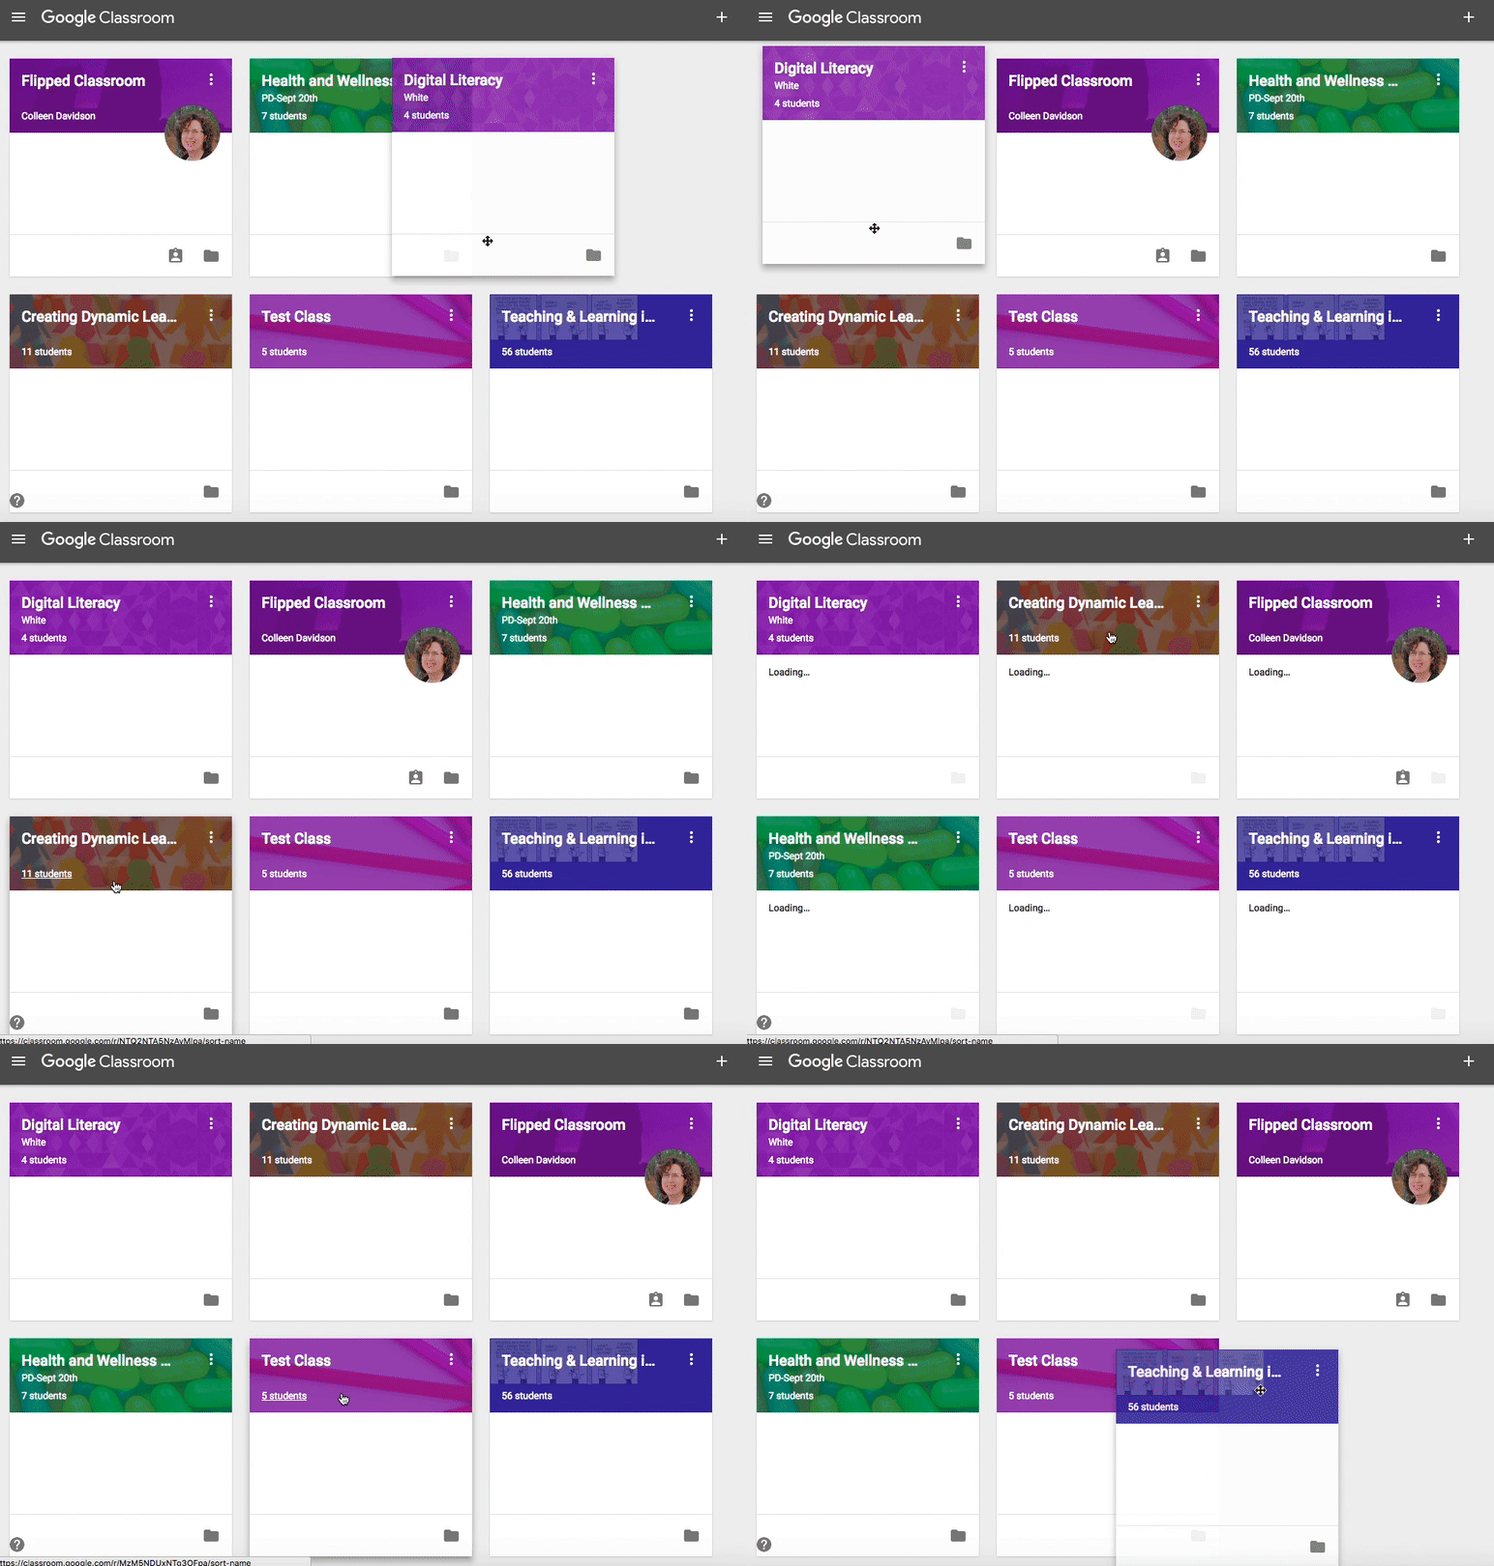
Rearrange the Class Tiles 


Simply click and drag to rearrange the tiles.
You can also click on the three dots in the top right of the class & move that class to the bottom or top,


  https://gyazo.com/e637921bb534cd6bca5ee0959749b10a


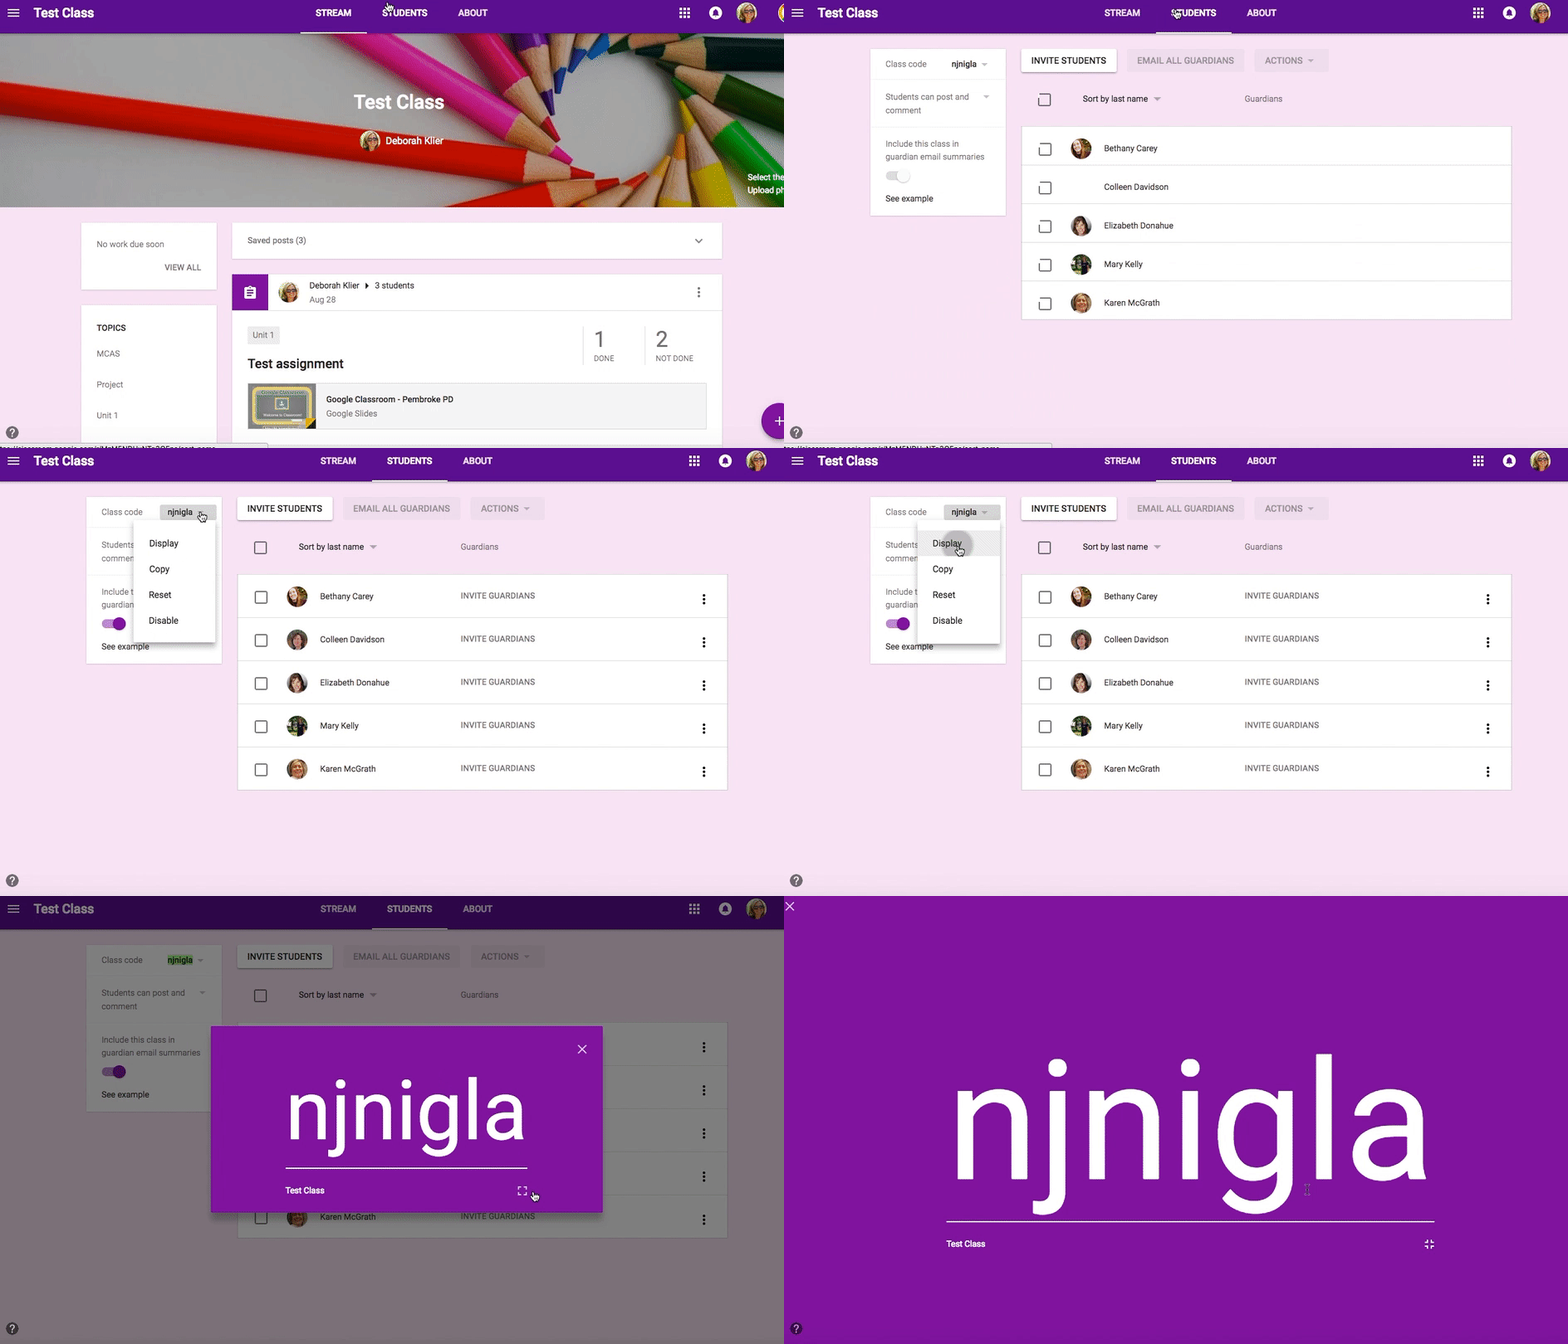
Large Class Code Display 


From the Students Tab you can now display a LARGE class code to share with students.
Click on the dropdown next to class code and choose Display.

https://gyazo.com/f158413b808bab85b728fe1fbbd15a06


Transfer Class Ownership


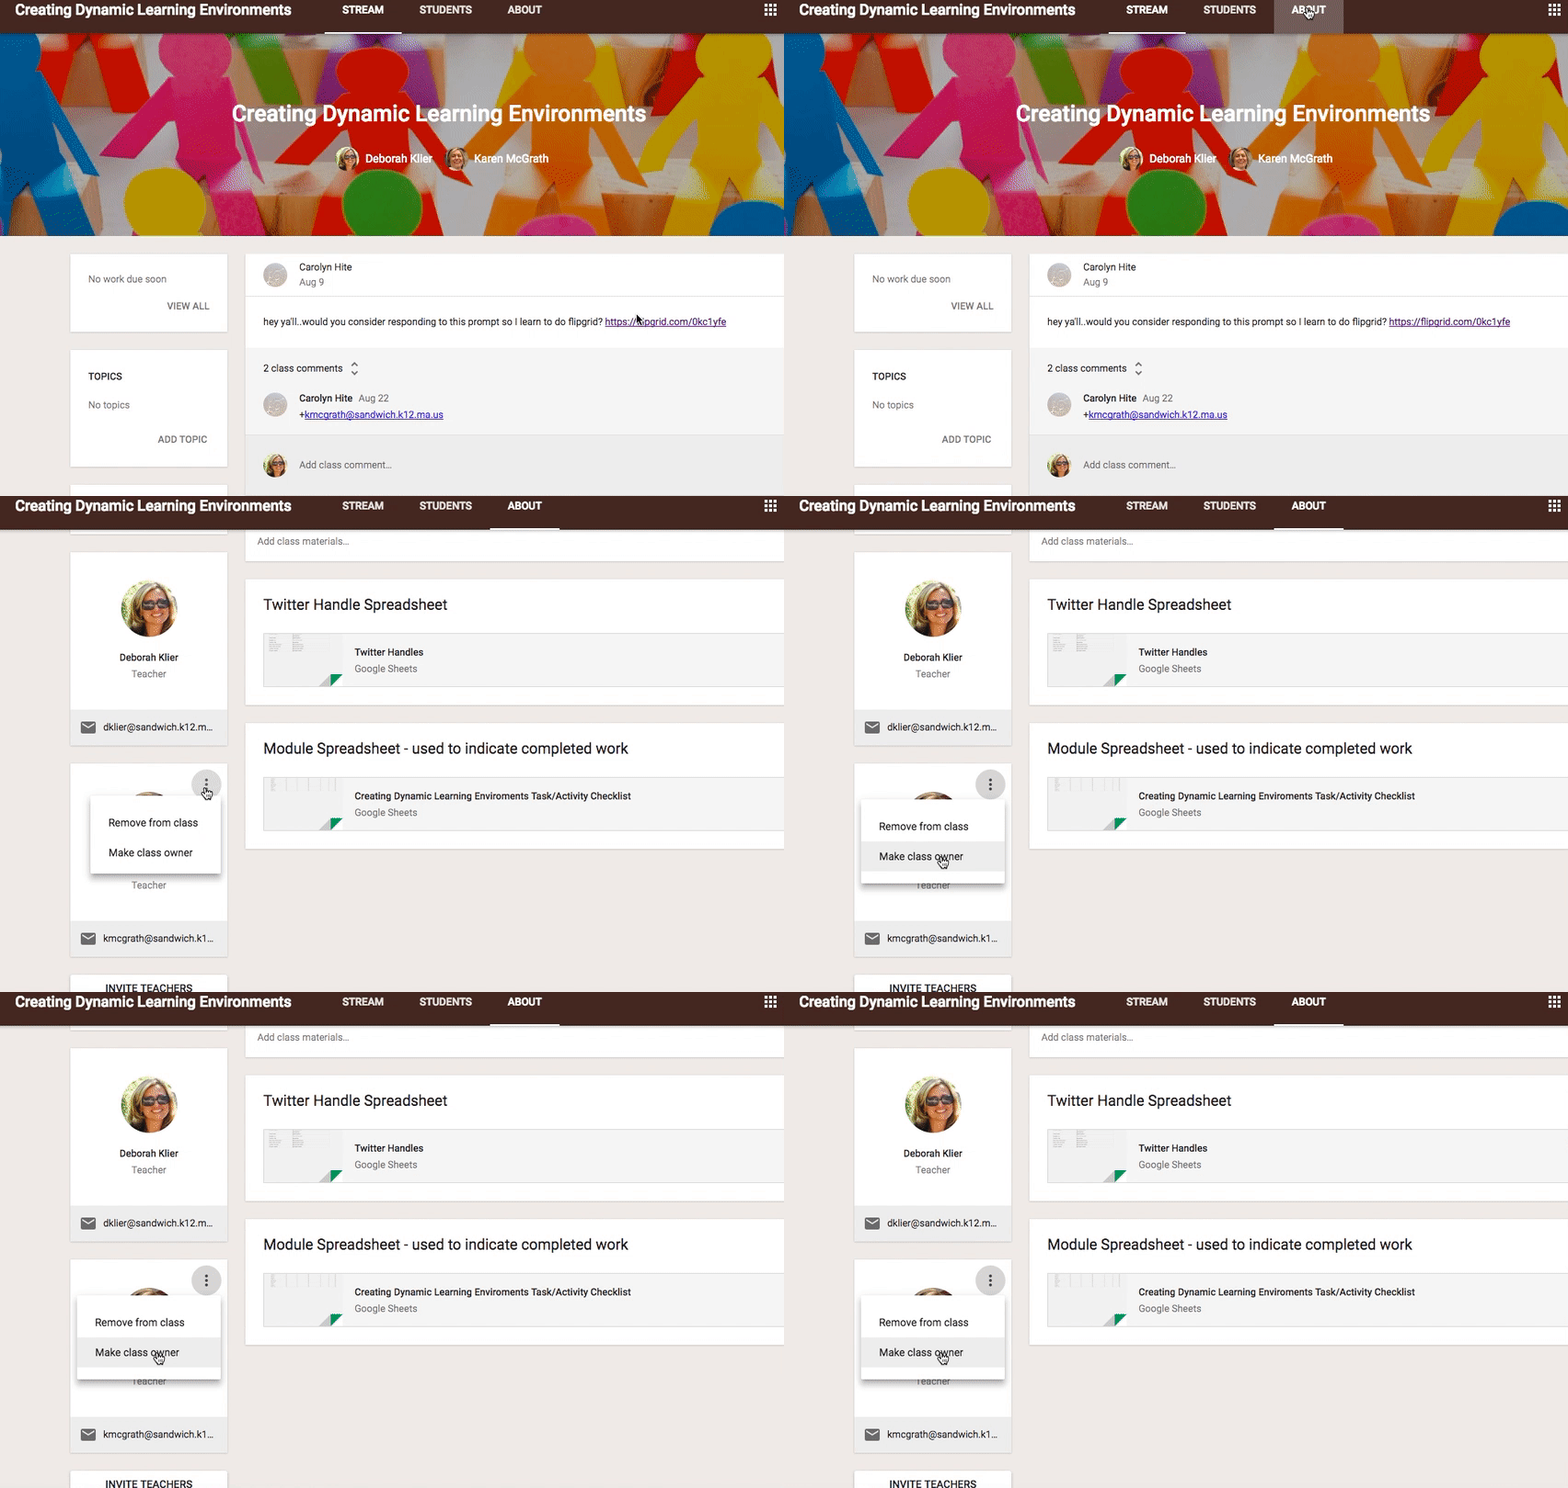
From the About Tab you can transfer ownership of the class to a co-teacher.
(If you need to invite the co-teacher first - then do so.)

Click on the three dots next to co-teacher
Choose Make class owner
Once the teacher accepts ownership they will become the main teacher for the classroom. 


https://gyazo.com/5f7202e5b8c34092a603d6f9f0e65f6c


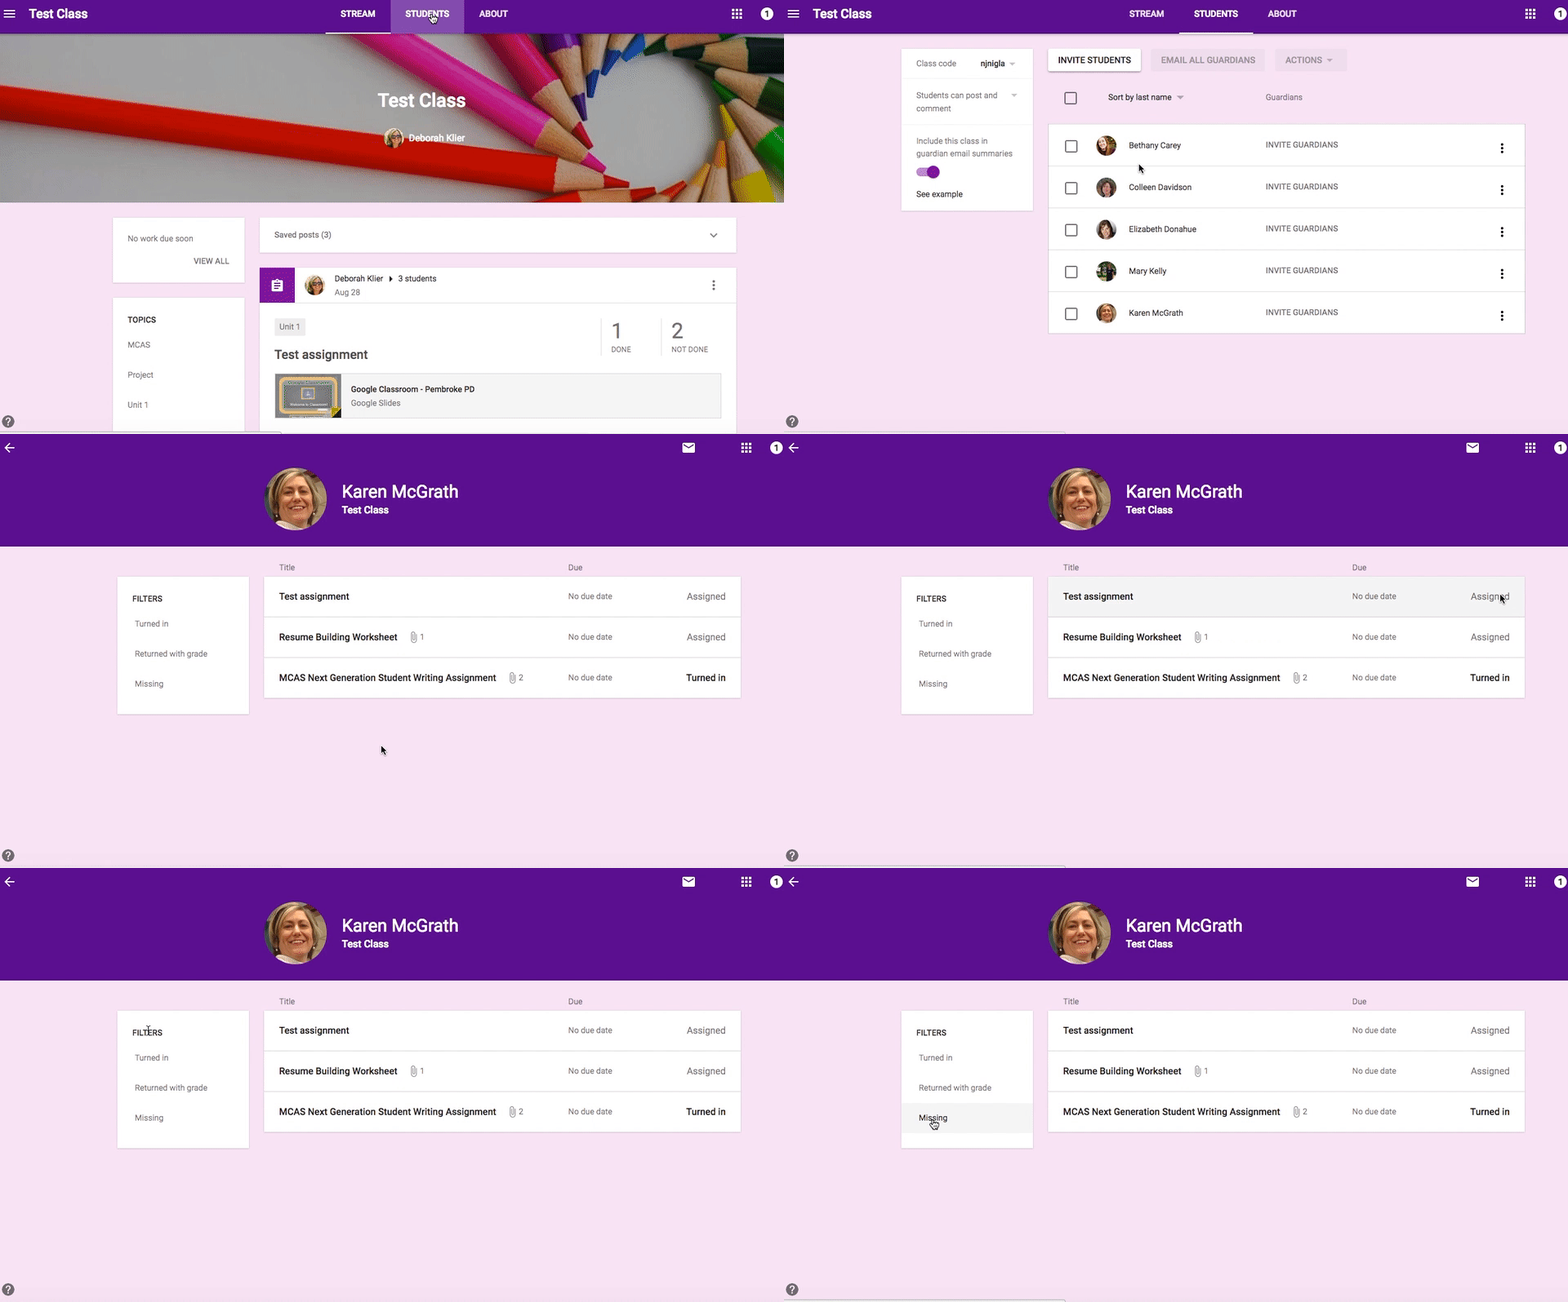
Individual Student View


Want to view all the work of one student in classroom?
Click on Students Tab.
Click Student name to see the list assignments and the status of the assignments.

If the list is long you can filter it by turned in, missing, or returned with grade.


https://gyazo.com/6304141372211fe92b15066ad71f969b


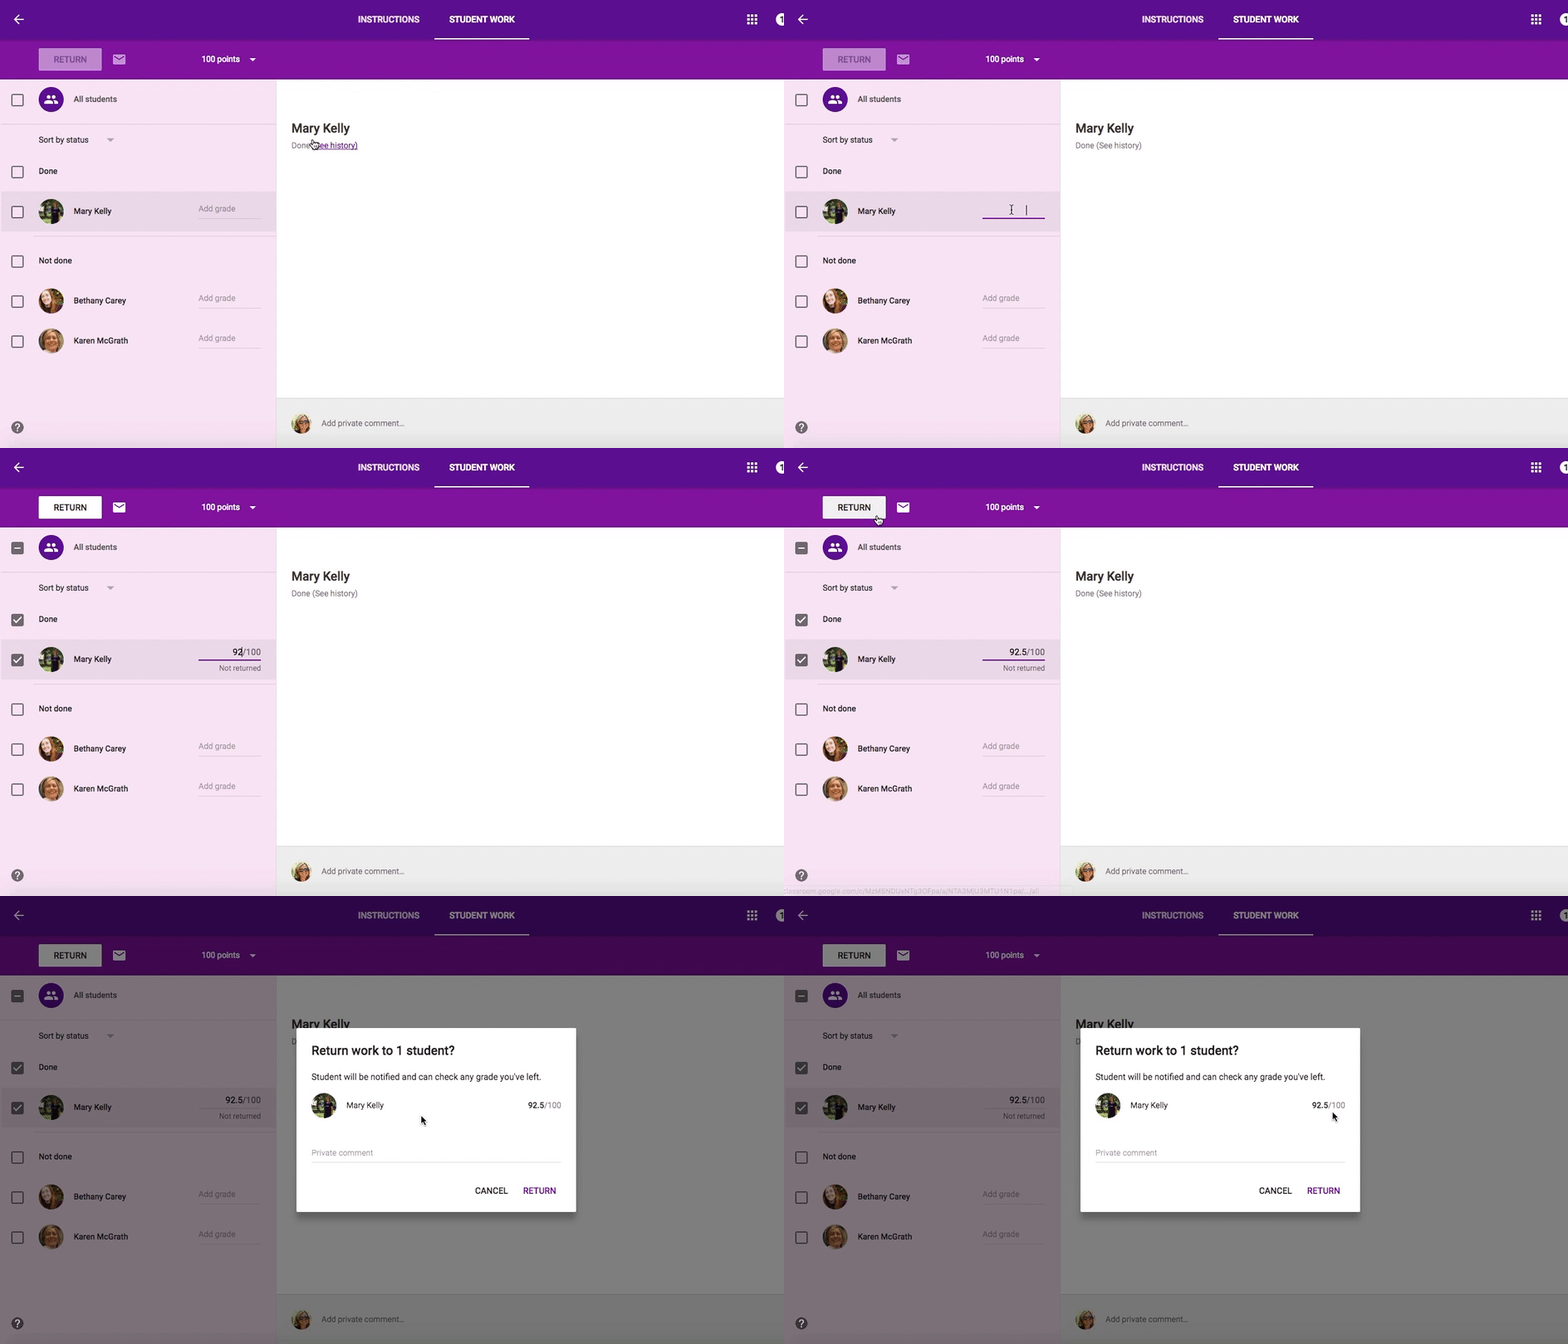
Decimal Grades


Entering decimal grades for assignments in Classroom is also a new feature.

https://gyazo.com/20d3b6e1c5fe2c1663b6c9fd8d94d4ae

Tuesday, June 13, 2017

Google Classroom End of Year Wrap Up Tips

As the school year comes to a close and you start cleaning up the physical classroom this is also a good time to clean up things in Google Classroom.  Here are some Google Classroom clean up tips to help you organize and prepare for next year.


Tip 1
Unenroll/Remove Students from Classes
This is useful if you don’t want students to have future access to course content. One reason for this might be so students do not share the course content to new/future students taking the course.
To Remove students from class:
  • Open the “Classroom” and click on Students Tab
  • Check the box at the top to select all the students in the class
  • Click Actions
  • Choose "Remove" from the drop-down


Tip 2
Archive Classes

Another way to clean up Classroom is to archive old classes.  Archived classes are saved but will no longer appear on your homescreen and you will not be able to add assignments.  However,  you will be able to reuse posts & assignments from archived classes.

Archive Class:
  • Go to Classroom Homescreen
  • Click the 3 dots in top right of class you want to archive
  • Choose Archive from the drop-down
  • Click Archive again to verify


How to Un-Archive a class (just in case):
  • Click the menu from Classroom Homescreen
  • Scroll down to and choose Archived Classes (at bottom)
  • Click the 3 dots in top right of class you want to un-archive
  • Choose Restore
  • Click Restore again to verify


Tip 3
Clean Up Old Class Calendars
Google Classroom automatically creates a Google Calendar for each class you create. As you create assignments with due dates they get added to the class calendar.  Accessing the calendar for a class is a handy way for you and your students to view upcoming due dates for assignments.

When the class is over you can remove the calendars for each class so your calendar list doesn’t get to big.

Remove Old Calendars
  • Go to Google Calendar
  • Look under My calendars on left side of screen (classes will be listed here)
  • To remove a calendar you will access that calendar's settings.
  • Click the small down-arrow to the right of the class calendar you wish to remove (in the My calendars list)
  • To delete the calendar, choose Calendar settings
  • Scroll down to the bottom of the calendar details screen and click Permanently delete this calendar
  • Click Yes in the pop-up window that appears and choose Delete for everyone


Tip 4
Clean Up Google Drive by Moving Classroom Folders
Google Classroom automatically creates a "Classroom" folder in Google Drive. In this folder is a sub-folder for each class you have created.  This is where all the assignments and documents are stored.

  • Go to Google Drive and select the Classroom folder to open
  • Create a new folder by clicking New and New folder
  • Name it something like “Archive” "Old Classes” or “2016-2017 Classes” (notice I added the number 1 at the beginning of my new folder “name” so this folder would appear at the top of the list)
  • Now you can easily drag and drop the old class folders into this new folder or right click on folder and choose Move to and select new folder


Note: Moving class folders does not affect Google Classroom in any way. It just makes your "Classroom" folder neat and ready to go for next year.
Tuesday, March 21, 2017

Add Topics in Google classroom


Are you using Topics in Google Classroom?  If not here is why you should.

Topics can be added and used to organize and filter posts in the stream. This makes it easier for students to find assignments.


Add Topic from the stream
On the left side of stream choose Add Topic.


Add Topic when posting
When posting an assignment, announcement or question you can create a topic or choose from the list.


Filter by Topic
Filter the stream by topic to easily find assignments. When a filter is applied only the posts for that topic will appear in the stream.


Edit Previous Posts
You can add topics to previously posts by clicking on the 3 dots in upper right of post and choose Edit.


Topic Ideas

  • Units
  • Subject
  • Groups - assign a different topic to each group

Saturday, March 11, 2017

Use the "Create a Question” feature in Classroom


Here are few ways you can use the “Create a Question” feature in Classroom


DISCUSSION STARTER

Post a question in Classroom as a discussion starter to engage students in meaningful talk. Let them reply to each other by turning on the “Students can reply to each other feature”


Monday, September 26, 2016

Create a copy of file for each student

Have a file “template” and want to distribute to students so they each have their own copy?
When attaching a file in Google Classroom you have 3 ways of distributing the file to students.
  1. View file - Students can view the file only. This is good for providing assignment instructions to students.
  2. Edit file - All students can make changes to the file.
  3. Make a copy for each student - Each student receives their own individual copy of the file that they can change.
Notes:
  • If you have already added the file and posted the assignment - Make a copy will no longer be an option.
  • Once each student has their own individual copy - any changes you make to the document will not be reflected in their copy.

Monday, August 1, 2016

Schedule Assignment in Classroom

Teachers asked and Google listened.
You now have the ability to schedule assignments, announcements, and questions at a later date in Google Classroom. This is useful for planning (ahead) purposes.
When you click on assign, post, or ask you will now see an option for Schedule which will bring up a window similar to the one below depending on the option you choose:
Click the dropdown next to the date and you can schedule when you want the assignment to post in Classroom (just make sure to schedule the assignment before the due date of the assignment).
You can even use this option when you reuse an assignment.
Thanks Google!

Thursday, June 9, 2016

Reuse and Assignment in Classroom


  1. Go to Classroom (any class)
  2. Click add
  3. Click Reuse post
  1. Click on the class with the post you want to reuse and click Select
  1. Choose the post you want to reuse - to reuse attachments - check Create new copies of all attachments box
  1. Click Reuse.
  2. At the next window you can change any information in the post and delete or add attachments if needed.
  3. Then you can:
  • Save as Draft, Assign, Ask or Post (depending on the original assignment)

Monday, November 24, 2014

Google Classroom


I started using Google Classroom with students early in the year.  I was co-teaching a unit on research with my colleague Karen McGrath so we could learn more about Google Classroom and provide important research skills to students.  

First of all Google Classroom is easy to set up:


  • Login into your Google account
  • Go to Classroom
  • Click on the + (top right)
  • Click Create Class 
  • Add a Class Name & Section
  • Click Change class theme (on the right side) Choose from a gallery images or upload your own image which will become a banner for your classroom.
  • Click on the About tab to add details about the class such as name, description, room number.  You can also attach files such as the course outline to this page.
Now it's time to add students (there are a couple of ways to do this)

1. Invite Students (via email) to join the class:
  • Sign in to Classroom at classroom.google.com.
  • Click the class you want to add students to.
  • At the top, click Students.
  • Click Invite.
  • Check the box next to the students you want to invite or check the Select all box to invite all the students listed.
  • To see other contact lists, click My contacts.
  • Invited students will receive an email
  •  The student must then click a link in the email or sign in to Classroom and click Join.
2. Give students a code to add themselves:
  • To get the code go to the class page. The code will be on the left of the stream.
  • Send an email to students with the class code or write it on the board in your classroom.
  • Give the students these instructions:
    • Sign in to Classroom at classroom.google.com.
    • On the Home page, click add.
    • Enter the code that I gave you in the box and click Join.
  • To reset the code or disable it, click the code and select Reset or Disable.